If you are a beginner and just looking out how to install WordPress website or blog, it must be hard to figure out where to start.
In this tutorial, we have listed a complete guide on how to install WordPress on some of the popular hosting servers for beginners and advanced users. For our beginner developers and designers, you can find out more about installing WordPress on your localhost here.
WordPress is known as one of the simplest, most popular website builders. It powers over 34% of the total websites on the internet. Yes, more than one of the four websites that you visit is likely to be developed or powered by WordPress.
Installing WordPress is a very simple process in most hosting companies with just a few clicks and takes less than a few minutes to complete.
Before we move on to how to install WordPress, there are things you need before installing WordPress.
First, you’ll need a good web hosting company that knows WordPress and a domain name. We highly recommend using Bluehost because it provides 60% off of their hosting plans and provides a free domain.
How to Install WordPress on Different Hosting Providers
Below are the steps to show you how to install WordPress on different hosting servers.
- How to Install WordPress on Bluehost
- How to Install WordPress on WP Engine
- How to Install WordPress on SiteGround
How to Install WordPress on Bluehost
Bluehost is one of the top WordPress hosting providers recommended by WordPress.org. It is one of the largest and most popular hosting companies in the world. They have an automatic WordPress installation wizard and are completely for WordPress hosting.
Installing WordPress in Bluehost is simple and fast with just some clicks away. You can install WordPress automatically on your domain name when you register and proceed ahead.
Once you login into your Bluehost account, you will find a list of tabs on the left side of your dashboard if you are logging in from a desktop or a laptop.
You can find your website lists under the “My Sites” tab. You can directly login to your WordPress area by a click on the “Login in” button on your website lists.
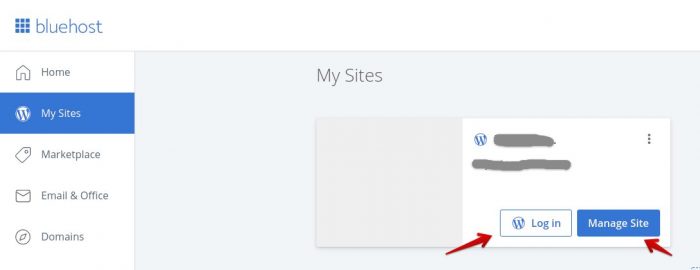
Under the same “My Sites” tab section you can get started installing WordPress by simply clicking on the “Create New Site” button.
Bluehost allows you to install WordPress on unlimited sites on all of their hosting plans besides their “Basic” plan. For the “Basic” plan, you can set up WordPress on one domain name only.

After you click the button, it will launch a guided WordPress installation wizard. Enter the site name and an optional tagline.
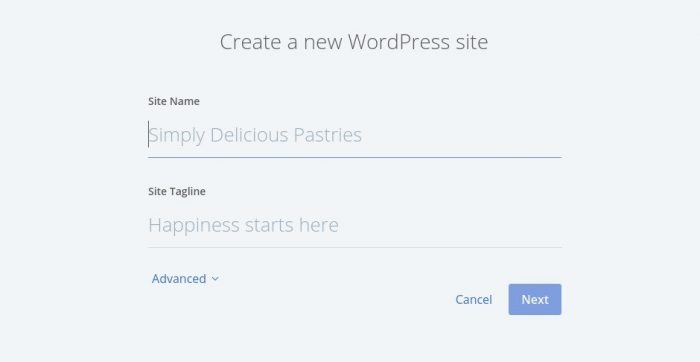
Click on the “Next” button to continue which will take you to the page where you can select your domain name.
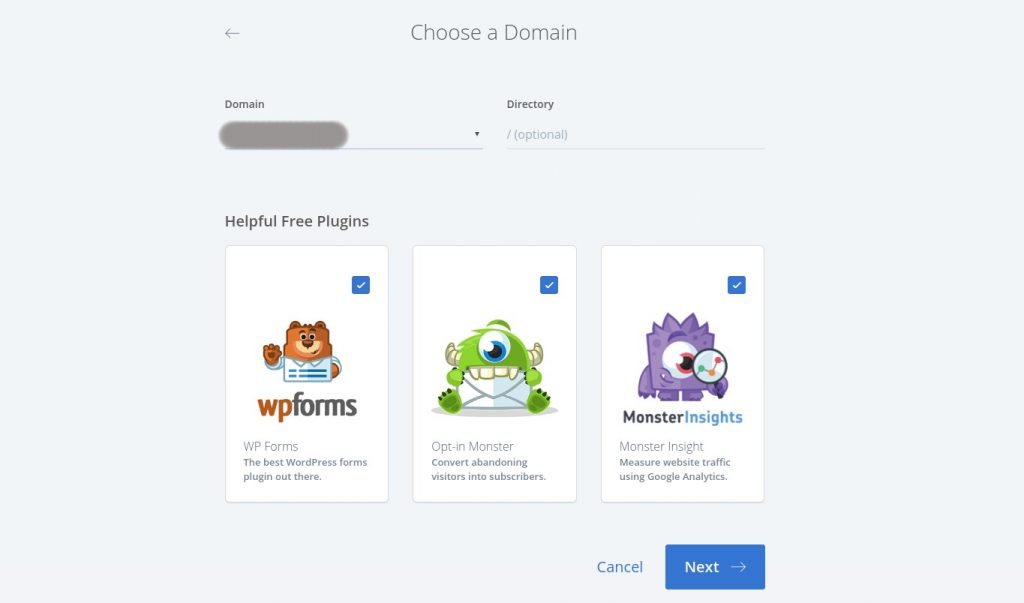
You’ll be asked to select a domain name and the path for your website. You can select the one from the dropdown if you have already purchased it.
You can purchase and add new domain names anytime to your account from the “Domains” page of your hosting dashboard.
After selecting your domain name, you can leave the directory path empty and let Bluehost handle it for you.
The installer wizard will show you some helpful free plugins that could be essential for your website and can install them from the wizard.
Click the “Next” button to continue. This will take a few moments to completely install your WordPress site for the installer.
After that is completed, you will see a successful message with your WordPress site URL and login details.
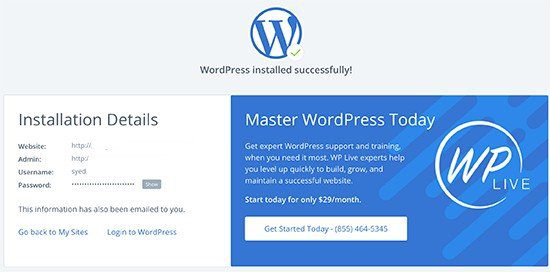
You’ll also receive these details in the email address associated with your Bluehost account. You can now enter into your new site’s admin area from the “Login to WordPress” button.
Congratulations, you have successfully installed WordPress on your Bluehost hosting account and can start building some awesome websites, e-Commerce stores, and blogs.
How to Install WordPress on WP Engine
WP Engine is another best-managed WordPress hosting service provider. One of the best managed hosting services for your WordPress websites.
They handle site updates, performance optimizations, and installations while you are busy crafting your site, generating traffic, and increasing sales or increasing members in your community.
When you sign up for WP Engine, it automatically installs WordPress. As a managed WordPress hosting and depending on your hosting plan, you can also add as many numbers of websites as you need them.
It is slightly easier to install WordPress on Wp Engine than other web host providers where you would not need to have great technical skills.
Moving on, simply login to your WP Engine’s user portal and click on the “Sites” pages.

After you click the “Add Site” button, you’ll be navigated to a page to provide a few details about your site. Enter the name that helps you recognize this website and once again hit the “Add Site” submit button.

Wait for some moment as WP Engine will install your site and provide you with a temporary domain. An email will be sent to your email address with the new credentials.
After the installation is completed, you’ll be able to access the WordPress admin dashboard by clicking on the sidebar of your production environment. You can also view the login credentials on the same page.
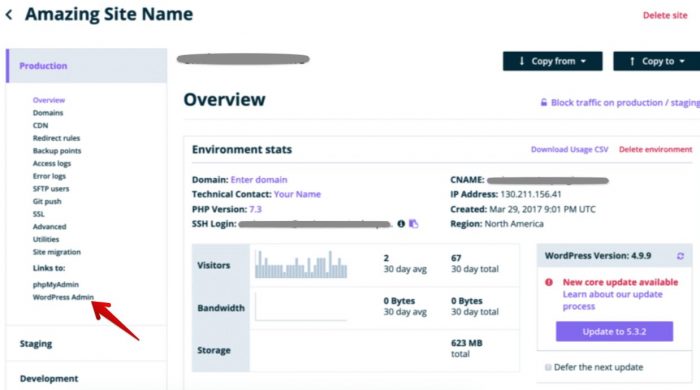
As you can see the installation provides you with a temporary domain name from where you can access the installed website. You can access the site with the provided temporary domain name.
Since WP Engine is not a domain registrar, you need to buy a domain from domain registrar sites and point your domain’s DNS to WP Engine.
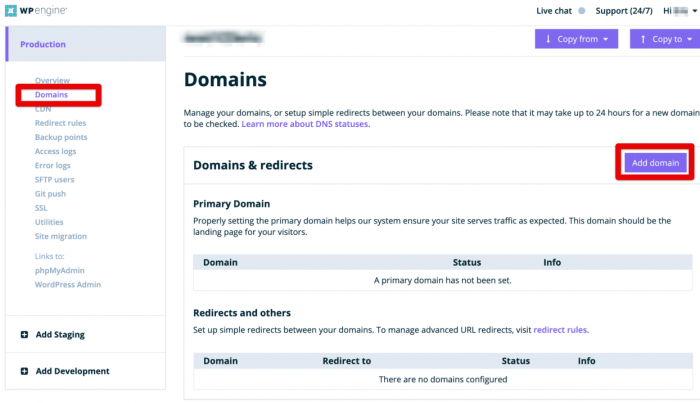
After you’ve clicked the Add Domain button, add the selected domain name into the field. Click the Next button.
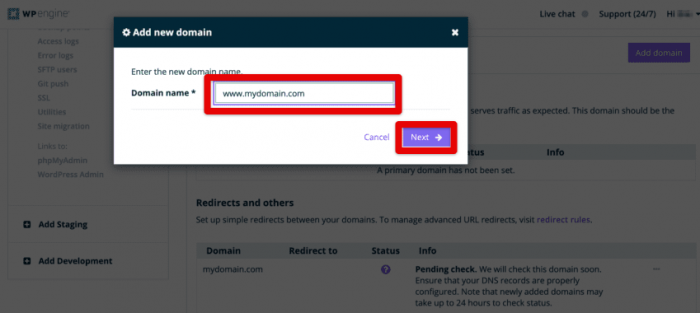
Setting up a domain name is pretty much the same as every domain registrar. You’ll need to find their DNS settings.
Login to your domain name registrar account dashboard. Find a section inside your domain name settings that says Manage DNS & Nameserver.
On the next screen, you’ll find lists of items that are the default settings of your domain name. First, you need to change the A record with the @ sign as its name. Click on the Edit button and edit it with the IP Address provided by WP Engine and update the DNS.
There is another setting that you need to see if you have a CNAME record with www as its name. If you do have the record, then you will need to edit that CNAME record. Otherwise, click on the ‘Add DNS Record’ button. And add the CNAME subdomain provided by WP Engine.
These steps will successfully point your domain name to the WordPress site hosted in WP Engine.
This will take some moments to take effect. And you’ve successfully installed a WordPress website in WP Engine.
How to Install WordPress on SiteGround
SiteGround is another popular managed WordPress hosting platform for beginners. They have great 24/7 support teams and managed hosting plans.
It is quick and easy to install WordPress with their step-by-step installer available in all of their plans. Anyone with access to the SiteGround user portal credential can set up the website without any trouble.
If you’ve already purchased a plan then follow the steps below otherwise please purchase the hosting plans suitable for your business or blogs.
After you’ve logged in to the SiteGround dashboard, navigate to the menu that says “Websites” and click the “New Website” button.
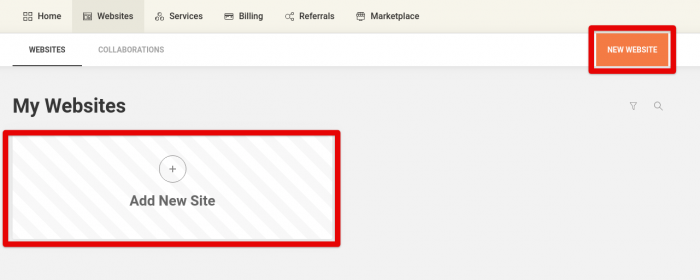
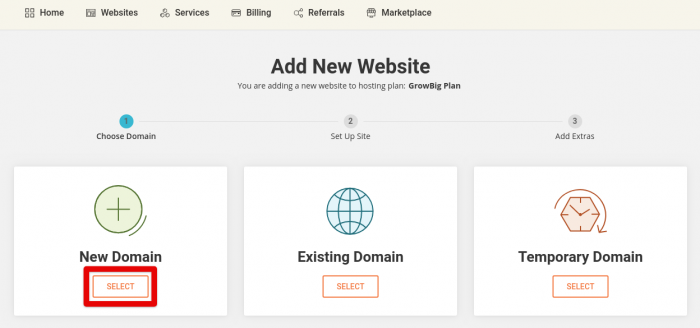
Once you are redirected to the page to add a new site, there are options to select from. They are “New Domain”, “Existing Domain” & “Temporary Domain”.
If you already have purchased a domain name then click on the “Existing Domain” menu. And if you want to create a staging/development environment, then click on “Temporary Domain”.
Because we are setting up everything new, let’s click on the “New Domain” button. Yes, SiteGround allows you to search and add your desired domain name right within the hub.
Search your desired domain from the field and select the one that fits you. Here at WP Tiro, we prefer using domain names with extension as Dot-coms (.com).
Dot-coms are by far the most used extension and their original intentions are for domain registration to commercial organizations.
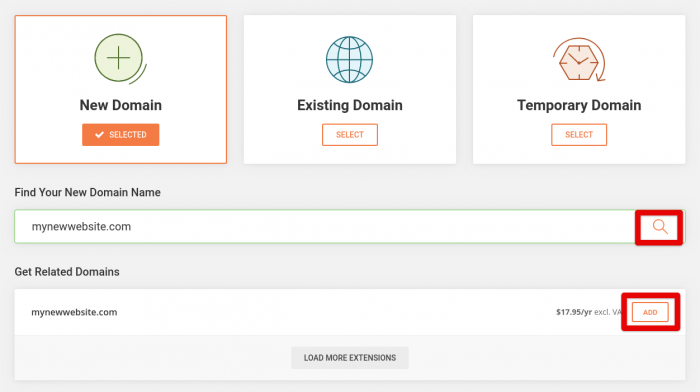
Now that you’ve selected the domain name and clicked on the “ADD” button, it is now time to hit that “CONTINUE” button. This will take you to the page where we will be able to select an option to begin the installation of WordPress.

Enter your Email address and a secure password or allow it to generate it automatically and continue.
Before it completely installs the WordPress we have a pending payment left for the domain name we used earlier. Add a payment method or use your existing method and complete the payment. The amount may vary based on the domain name.
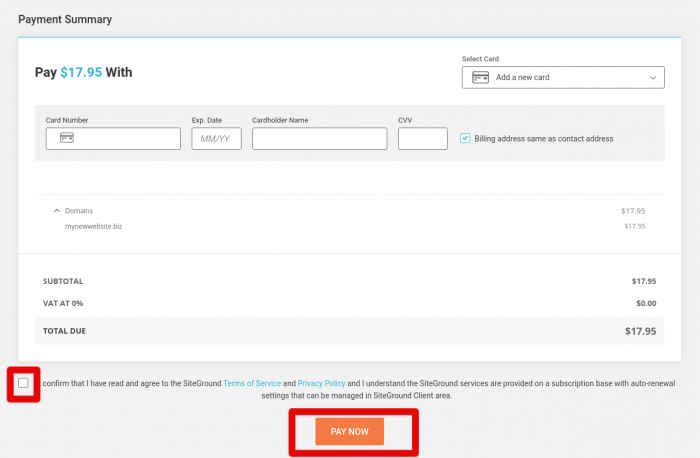
After you finish the installation, an email with all the credentials will be sent to your email address.
Congratulations! You’ve now successfully installed WordPress on SiteGround.
Conclusion
Here we have listed the three major WordPress hosting service providers who are the best in business. We hope this WordPress installation tutorial will help you learn how to easily install WordPress on Bluehost, WP Engine, and Siteground.
The steps are similar to other hosting providers. You may check out some other WordPress hosting providers.
If you liked this article, subscribe to our Newsletter and leave us a comment below. We send some awesome WordPress tutorials through our newsletter.

